
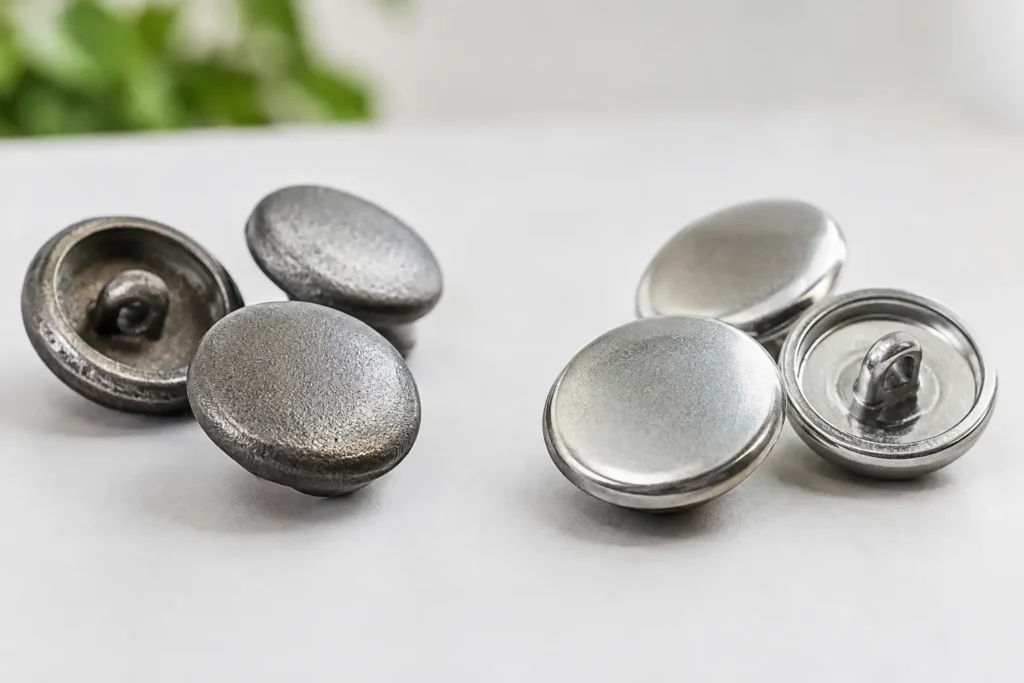
A metal button can look correct in a design presentation and still be wrong for production. The decision between cast versus stamped buttons affects more than appearance: it changes the practical options for logo depth, edge profile, attachment construction, finish consistency, garment use, tooling, sampling, and bulk-production planning.
For most apparel programs, stamped buttons are the efficient choice for flatter, repeatable shapes and higher-volume runs. Cast buttons are usually the better starting point when the design needs greater relief, sculpted form, recessed detail, or a more dimensional edge. Neither process is automatically superior. The right choice depends on the approved visual target and the performance requirements of the finished garment.
Cast Versus Stamped Buttons: The Direct Difference
A stamped button begins with sheet metal. A press uses shaped tooling to cut, form, emboss, or deboss the material into the required component. Depending on the design, the button may be made as a one-piece component or assembled from multiple parts, such as a cap and shank. Stamping is commonly considered for materials including brass, steel, or aluminum, subject to the design and finish requirement.
A cast button is formed by introducing molten metal alloy into a mold or die cavity. Zinc alloy is a common option for cast fashion hardware and buttons because it can reproduce detailed surfaces and more complex contours. After casting, components may require trimming, polishing, plating, painting, coating, assembly, or other finishing steps.
The distinction matters because sheet metal is formed from a relatively uniform thickness, while casting creates a three-dimensional part. That difference influences which details can be made cleanly, how the back is constructed, and how the button feels in the hand.
When a Stamped Button Is the Better Production Route
Stamping is often well suited to jeans buttons, uniform buttons, blazer-style buttons, snaps, and fashion buttons with a relatively shallow face profile. A clean embossed logo, a rim, a recessed border, or a simple center motif can often be produced efficiently when the geometry is compatible with the press process.
The appeal is not simply cost. A stamped construction can provide a crisp, controlled metal appearance, especially where the design relies on flat planes, defined edges, or a conventional cap shape. It may also be a practical route where low component weight is useful, although the final result depends on metal selection, diameter, thickness, and back construction.
There are design limits. Very deep logos, sharply undercut forms, and heavily sculpted surfaces are generally less suitable for stamping. Designers sometimes specify a deep three-dimensional emblem based on a digital rendering, then expect the same appearance from a pressed sheet component. During feasibility review, that concept may need to be simplified, made shallower, or changed to a cast construction.
Stamped buttons also require careful attention to the visible face after plating or coating. A broad, flat surface can reveal scratches, handling marks, or minor forming variation more readily than a textured design. Brushed, antique, matte, or textured finishes may help support the intended appearance, but finish selection should be reviewed against the approved physical sample rather than a screen image.
Common stamped-button specification points
For a stamped button, the production specification should identify the face diameter or Ligne size, metal type where relevant, target thickness, logo artwork, relief direction, edge treatment, attachment type, and finish. It should also clarify whether the button is a sew-through style, shank button, tack button, or another assembled construction.
If the garment uses a tack attachment, the button cap and tack must be evaluated as a system. The cap may look acceptable on its own while the assembled result requires adjustment for fabric thickness, installation method, or holding performance. This is particularly relevant for denim, heavyweight workwear, outerwear, and multilayer garments.
When Casting Makes More Sense
Cast buttons give product teams more freedom to create depth. A raised crest, sculpted animal, dimensional monogram, irregular edge, rope border, or deeply recessed brand mark can often be developed more convincingly through casting than through sheet-metal stamping.
Casting is also useful where the button needs visual mass. A thicker sidewall or more substantial profile can support a premium-looking outerwear, military-inspired, fashion, or uniform concept. However, more visual mass can also mean more actual weight. That is not automatically a problem, but it should be considered for lightweight fabrics, knitwear, shirt fronts, or garments with a large button count.
The back construction needs equal attention. A cast shank may be integrated into the component or assembled separately depending on the required design and production route. Shank geometry, hole size, and attachment area should be reviewed for the thread type, sewing method, and expected garment use. A decorative front face does not by itself confirm that the back construction is suitable for production.
Casting supports detailed artwork, but it does not make every fine line practical. Extremely small text, narrow gaps, thin projections, and sharp internal corners may fill inconsistently or lose definition after polishing and finishing. NZXTRIM typically treats artwork review as a manufacturing step: the goal is to preserve the recognizable design while adapting details that are too fine for stable bulk output.
Finish behavior on cast surfaces
Cast surfaces can be plated, painted, coated, antiqued, or otherwise finished according to the approved development route. The selected finish can emphasize or soften relief. For example, an antique effect may make recessed logo areas more visible, while a bright finish may highlight raised geometry and edge quality.
A finish sample should be evaluated under normal working light and alongside the garment fabric. Color perception, reflectivity, texture, and the visibility of small surface variation can change substantially between a digital image, a loose trim sample, and a button sewn onto a finished garment.
Tooling, Sampling, and Change Control
Both cast and stamped buttons normally require tooling for custom shapes, logos, or construction details. Tooling is not merely an administrative cost. It translates artwork into a production method, with allowances for metal flow, forming depth, draft, shrinkage where applicable, finishing, and assembly.
For this reason, a vector logo or CAD drawing is a starting point, not a final manufacturing specification. Product teams should provide the intended diameter, preferred construction, finish reference, logo placement, attachment method, and expected garment application. If a specific brand color is required, the Pantone reference and the finish type should be submitted together. A Pantone target on painted resin-like color and a Pantone target on plated metal are different development questions.
Physical sampling is the point at which visual intent becomes measurable. Review the sample for logo readability, face profile, edge comfort, back construction, finish appearance, button weight, and consistency across multiple pieces. For tack or snap-style products, review the installed sample on the actual or representative fabric construction.
Do not treat an approved development sample as permission to make informal design changes during bulk production. A small alteration to logo depth, plating tone, cap thickness, or shank position can affect appearance and assembly. Changes should be documented against the approved sample and confirmed before production proceeds.
Cost and MOQ: Compare the Whole Program
Cast versus stamped buttons should not be decided from unit price alone. Tooling complexity, material choice, number of finishing operations, assembly requirements, inspection criteria, order quantity, and packaging can all affect the commercial result. A stamped design may be economical at scale but require a redesign if the original artwork is too dimensional. A cast design may support the desired visual identity but involve more finishing steps or a different tooling approach.
MOQ and lead time should be confirmed for the specific construction, material, finish, and order quantity. These variables can change when a program includes custom plating, painted color development, multiple sizes, special packaging, or separate components. The sampling route should also be planned early when the garment calendar has fixed fitting, salesman sample, or bulk delivery milestones.
Performance Should Be Defined by Garment Use
The button process does not independently determine performance. The relevant question is how the completed button construction performs on the intended garment. A decorative button for a lined blazer has different requirements from a tack button on rigid denim or an exposed closure on industrial workwear.
Before confirming a route, define the fabric type and thickness, installation method, expected laundering or dry-cleaning process, exposure to abrasion or perspiration, attachment method, and applicable buyer requirements. Any requested testing, restricted-substance review, certification scope, recycled-content claim, or sustainability statement must be verified for the exact material, finish, order, and supply route.
A practical starting point is simple: use stamping when the design is shallow, structured, and repeatable; use casting when depth, sculptural form, or dimensional branding is central to the button. Then validate that choice with a physical sample on the garment, because that is where a visual concept becomes a production-ready trim.